Sunday 27 June 2021

Kutchwork tutorial


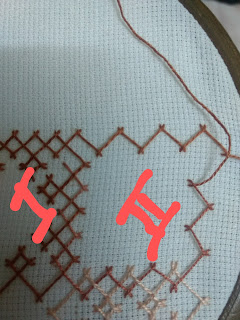
 This is a cushion cover l am embroidering nowadays.the tutorial for the kutchwork is as

below.

First round:the outermost frame is done.it can be worked continuously for whole pattern.


                         ......                           Second round:then inner round of first square is done
 
two sides have full framework done but two sides have only half.yhis is completed when framework for adjacent squares are done.

Third round:after doing square 1 the adjacent framework of square 2 is done as in the fig.
Fourth round,:the framework of square 3 is done .after doing these steps frame of square 1 is completed and its filling can be started

.fifth round:inner filling of first square is done.
Sixth round:outer filling of first square is done.
Consequently other squares are filled following the above steps.

Sunday 20 June 2021

Kutchwork cushion

staryed a new project of kutchwork.
 Previously I thought that  printing kutchwork design on project was very difficult .you got to have the lines straight otherwise design looked crooked.i always thought that doing kutchwork on Matty cloth would be very easy and I was dyin g to do that.i had with myself some white Matty cloth and I planned to start this cushion.i have always done kutchwork after printing design on project.and I was used to working that way.sincethis was allover design I started calculating and planning.snd after some time I started the embroidery.and I got really frustrated as I had to pick out the thread so many times as I got the mistake in frame work for embroidery here and there.i have started from a corner and when I reached the centre I realised thai i had got the calculation wrong .my design was not centrally positined as it was offset by four threads or holes.first I decided to continue as it was but after some thought I decided to take out the  thread and started anew.but this time I started from centre.

Wednesday 16 June 2021

Fishbone stitch in two colours


 Two different colour threads are taken intwo needles and fishbone stitch is worked alternately with the two colors.
A centre straight stitch and the two left and right stitches are fine in first color ,then needle with second color is taken and the next set of left and right stitches are done in second color.
Inthis way whole shape is filled

https://youtu.be/W9AHS6N1F0U this is the video tutorial on YouTube for the same.

Friday 11 June 2021

Blackwork or kasuti cushion


 I have completed this cushion long back but it was lying unsewn. I attached a chain opening to the cushion and put on a cushion .but I will have to make a pair as I have two cushions.

Wednesday 9 June 2021

Chicken kari embroidery tips

when youare doing shadow work or chicken kari embroidery on sheet fabric like malmal,organza or thin cotton, you can end up having big gap inthe embroidery like inthe right leaf.in this project I am doing embroidery from front.

 In the right leaf embroidery,when we run out of thread weturn the work to back side and hide the thread in stitches.them we thread a new skein and knot it andstart working from a new place according to stitching.in this way we can see a gap in the embroidery from front that does not look nice .this gap is more evident in case of broader design
To avoid this when we start a new thread,we must join the thread where we finished the stitchso that we have a cross over at the back that is missing in the right leaf.


You can see the difference between the two leaves from back.here the left one(the right one from front)has gap.whereas right one has consistent stitches.