Thursday, 9 September 2021
Update on doily tatting
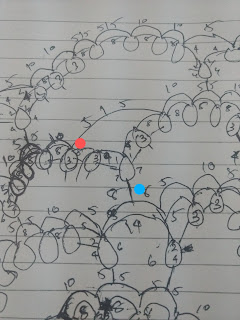
I have climbed to this round at the blue dot in photo using split ring.anf moved in the round further in clockwise direction.as I reached the red spot,to km avoid cutting and rejoining threads I used the split chain technique to join to the base of first split ring.After I tatted a ring (shown at blue dot)I left some bare thread to tat the chain between the rings,then tatted a ring and left some bare thread for chain tatting and joined to the first split ring using lock join.(at the black dot).now I will tat the chains and reach back to blue dotted point to start the next chain only round.This is the photo of doily after split chain tatting.
Sunday, 5 September 2021
Tatted lace for neckline
I wanted a very thin lace for neckline do I tatted only ring lace for it.I attached the lace from inside hiding the bare thread in lace.
Sunday, 22 August 2021
Tatting a doily
I have started tatting a doily .I got the pattern from pinterest.
After first' round I cut the thread by mistake and had to start the second round a fresh annd will have to hide the ends that I have not done so far.
The transition from second to third round was done using split chain and then split ring as pointed in fig.Third to fourth round transition is also done using split chain and then split ring.as pointed in figure.tne last round transition in next blog.
Sunday, 27 June 2021
Kutchwork tutorial
This is a cushion cover l am embroidering nowadays.the tutorial for the kutchwork is as
below.
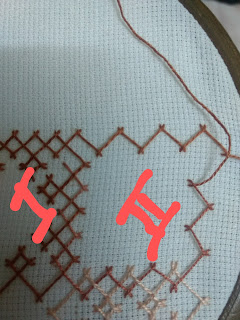
First round:the outermost frame is done.it can be worked continuously for whole pattern.
...... Second round:then inner round of first square is done

Third round:after doing square 1 the adjacent framework of square 2 is done as in the fig.Fourth round,:the framework of square 3 is done .after doing these steps frame of square 1 is completed and its filling can be started
.fifth round:inner filling of first square is done.Sixth round:outer filling of first square is done.
.fifth round:inner filling of first square is done.Sixth round:outer filling of first square is done.
Consequently other squares are filled following the above steps.
Sunday, 20 June 2021
Kutchwork cushion
staryed a new project of kutchwork.
Previously I thought that printing kutchwork design on project was very difficult .you got to have the lines straight otherwise design looked crooked.i always thought that doing kutchwork on Matty cloth would be very easy and I was dyin g to do that.i had with myself some white Matty cloth and I planned to start this cushion.i have always done kutchwork after printing design on project.and I was used to working that way.sincethis was allover design I started calculating and planning.snd after some time I started the embroidery.and I got really frustrated as I had to pick out the thread so many times as I got the mistake in frame work for embroidery here and there.i have started from a corner and when I reached the centre I realised thai i had got the calculation wrong .my design was not centrally positined as it was offset by four threads or holes.first I decided to continue as it was but after some thought I decided to take out the thread and started anew.but this time I started from centre.
Previously I thought that printing kutchwork design on project was very difficult .you got to have the lines straight otherwise design looked crooked.i always thought that doing kutchwork on Matty cloth would be very easy and I was dyin g to do that.i had with myself some white Matty cloth and I planned to start this cushion.i have always done kutchwork after printing design on project.and I was used to working that way.sincethis was allover design I started calculating and planning.snd after some time I started the embroidery.and I got really frustrated as I had to pick out the thread so many times as I got the mistake in frame work for embroidery here and there.i have started from a corner and when I reached the centre I realised thai i had got the calculation wrong .my design was not centrally positined as it was offset by four threads or holes.first I decided to continue as it was but after some thought I decided to take out the thread and started anew.but this time I started from centre.
Wednesday, 16 June 2021
Fishbone stitch in two colours
Two different colour threads are taken intwo needles and fishbone stitch is worked alternately with the two colors.A centre straight stitch and the two left and right stitches are fine in first color ,then needle with second color is taken and the next set of left and right stitches are done in second color.Inthis way whole shape is filled
https://youtu.be/W9AHS6N1F0U this is the video tutorial on YouTube for the same.
Friday, 11 June 2021
Blackwork or kasuti cushion
I have completed this cushion long back but it was lying unsewn. I attached a chain opening to the cushion and put on a cushion .but I will have to make a pair as I have two cushions.
Wednesday, 9 June 2021
Chicken kari embroidery tips
 when youare doing shadow work or chicken kari embroidery on sheet fabric like malmal,organza or thin cotton, you can end up having big gap inthe embroidery like inthe right leaf.in this project I am doing embroidery from front.
In the right leaf embroidery,when we run out of thread weturn the work to back side and hide the thread in stitches.them we thread a new skein and knot it andstart working from a new place according to stitching.in this way we can see a gap in the embroidery from front that does not look nice .this gap is more evident in case of broader design
To avoid this when we start a new thread,we must join the thread where we finished the stitchso that we have a cross over at the back that is missing in the right leaf.
You can see the difference between the two leaves from back.here the left one(the right one from front)has gap.whereas right one has consistent stitches.
Saturday, 29 May 2021
Cross stitch cushion cover
This cushion cover was a colour ful embroidery as I used all types of colours and it is a nice project to use your leftover threads.
Saturday, 22 May 2021
Printed cross stitch cushion cover
My daughter bought this printed cross Stitch design for cushion.ss the printed design was not so clear or what to say not printed nicely.,she left it midway.she also outlined the design with black thread but then also it was not looking good.so I ripped the embroidery ,turn it over and started this design on backside I got from pinterest.
Saturday, 15 May 2021
Kasuti embroidery on cushion
I also have many UFO .I have a piece of cloth on which a kasuti design is printed.i think think this was handed down by my mother.there were rows of design leaving some gap.do I thought to make two cushion covers.
The design was so placed that only three rows of designs came on front and the design on edges are almost invisible when seeing from front.
Three strands of stranded Anchor cotton thread is used for embroidery
. flowers are embroidered in kasuti stitch,leaves in rope stitch or twisted chain stitch and stems in stem stitch.
Tuesday, 23 March 2021
Chickenkari embroidery
Wanted to do some chicken kari embroidery on something.i had spare malmal dupatta on which I have done some tast stitches.i sewed a kurta from it for summer and it was perfect for chicken kari as this type of embroidery looks great on sheer fabric.l have used Anchor pearl cotton for it and white on white.
Monday, 1 March 2021
Table or chair socks
For chair or table socks to be thick and dense a smaller size hook is used as recommended for the yarn.
Here with 8ply yarn 3.25mm hook is used insteadof 5.5mm hook.a magic circle is made and 7 single crochet (sc) in the magic circle.
This pattern is crocheted in spiral.2nd row:make 2 sc in each stitch.then we get 14 sc.3rd row:1sc in first stitch and 2 sc in next stitch.repeat till the end.we get 21 sc.4th row:1 sc in first stitch and 2sc in the second stitch.repeat.we get 31 sc.
5th row:now we have made enough stitches for the base.from here we make 1sc in first stitch 1 chain then 1sc in the third stitch.repeat this pattern till we
reach the required length.then slip stitch in next stitch and fasten off.
Tuesday, 23 February 2021
Chevron cushion completed
The Chevron cushion got completed.after joining the zig Zag side with slip stitch,the other opening was stitched using mattress stitch.the third and last opening was left as it is to insert the cushion.three buttons were stitched on the edge and used to fasten the opening as shown below.it went easily through the double crochet on the other side.
Sunday, 7 February 2021
Joining the crocheted fabric for cushion cover
The curved edge will be joined using the slip stitch method.
Take one stitch from base chain (in cream colour) and the other through back loop on the other side (maroon colour)and do the slip stitch.
And do the slip stitch.
In this way the zig Zag edges are joined.
Thursday, 28 January 2021
Tuesday, 26 January 2021
Subscribe to:
Comments (Atom)


